Nowadays, most people use scikit-learn for machine learning projects. Because scikit-learn is a top quality ML package for Python and lets you use a machine learning algorithm in several lines of Python code, which is great!
As a machine learning researcher, I personally like to try and use other machine learning libraries. It’s good to have knowledge of other ML libraries in your arsenal. Since I used C++ for my projects, I decided to try a C++ machine learning library.
Last year, I did a bit of research on the internet and found mlpack. mlpack is fast and scalable machine learning library for C++ (Based on its definition on its website.). mlpack has the following features, which I think it worth the try.
- It is quite fast. (I will show an example next.)
- Its documentation is well written and has usage examples.
- It has bindings for Python.
- Comes with command-line programs that are ready to use. No need to write a single line of C++ for using some algorithms.
In this post, I want to show usage examples which may help you use the mlpack library. I have also chosen the random forest classifier for the usage examples. First, I briefly explain how to install the mlpack on your system. Then usage examples are given for both the CLI program and C++ API. Finally, I made a comparison between mlpack and scikit-learn with random forest classifier.
Table of Contents
Installation of mlpack
First of all, I suggest you use a Linux distribution for machine learning projects. This is not just my opinion but some other developers and researchers also agree on using Linux. Besides, the installation of mlpack on Linux systems is fairly straightforward.
Probably the easiest way to install mlpack is to use the package manager of your Linux distro (I personally use Ubuntu most often.). However, it’s not recommended to install mlpack using the package manager. Because in my case, Ubuntu, it installs an out-dated version of mlpack, which is 2.2.5 at the time of writing this.
Here I explain how to install mlpack from source and also install its dependencies. First, you have to install Armadillo and Boost libraries. For Ubuntu and Debian, mlpack’s dependencies can be installed through apt:
sudo apt-get install libboost-all-dev libarmadillo-dev
After the dependencies are successfully installed, you need to run following commands in terminal to install mlpack from source:
wget http://www.mlpack.org/files/mlpack-3.0.4.tar.gz
tar -xvzpf mlpack-3.0.4.tar.gz
mkdir mlpack-3.0.4/build && cd mlpack-3.0.4/build
cmake ../
make -j4
sudo make install
For more information about CMake configuration and etc, check out the installation tips in the documentation of mlpack.
Usage example
mlpack has command-line programs for some ML algorithms and also C++ API. In this section, I give an example for both of them. random forest algorithm was chosen for this purpose.
Dataset
Similar to mlpack docs, covertype dataset will be used for usage examples. the dataset has 100K samples and 7 classes. In short, this dataset is about predicting forest cover types from cartographic variables.
To download the dataset and unpack it, run the following commands:
mkdir dataset && cd dataset
wget https://github.com/mir-am/mirblog/raw/master/posts/mlpack-post-en/dataset/covertype-small.data.csv.gz
wget https://github.com/mir-am/mirblog/raw/master/posts/mlpack-post-en/dataset/covertype-small.labels.csv.gz
gunzip -k covertype-small.data.csv.gz covertype-small.labels.csv.gz
Make sure that you have downloaded the dataset. otherwise, you cannot follow the examples below.
CLI example
One of the interesting features of mlpack is that it has command-line programs that help you split the dataset and use a machine learning algorithm without writing C++ code.
In this example, first, we split the dataset into train and tests sets, which contains 70% and 30% of samples, respectively. To do so, run the following commands:
mkdir train test
mlpack_preprocess_split -i covertype-small.data.csv \
-I covertype-small.labels.csv \
-t train/covertype-small.train.csv \
-l train/covertype-small.train.labels.csv \
-T test/covertype-small.test.csv \
-L test/covertype-small.test.labels.csv \
-r 0.3 -v
Next, we train a random forest classifier with the following command:
mlpack_random_forest \
-t train/covertype-small.train.csv \
-l train/covertype-small.train.labels.csv \
-N 10 \
-n 3 \
-a -M rf-model.bin -v
I ran the “mlpack_random_forst” command on my system and training accuracy was 95.87 percent. Note that a random forest model is saved as well. Hence we can predict the test samples using the saved model. Now, run the following commands to predict the labels of the test samples:
mlpack_random_forest \
-m rf-model.bin \
-T test/covertype-small.test.csv \
-L test/covertype-small.test.labels.csv \
-p predictions.csv -v
After running the above command, I achieved an accuracy of 84.4 percent on test samples, which is lower than training accuracy as expected. If you have done this example, You might probably notice that mlpack is quite fast as it is advertised. On my Ubuntu system, I trained an RF model on 70K samples in about 10 seconds, which is pretty good. Moreover, I created a bash script here so that you can see the whole CLI example in one place.
I used random forest classifier as an example. However, mlpack has also other command-line programs for various ML algorithms. For more information, check out mlpack’s documentation. Next, I explain how to use mlpack C++ API for training a random forest model on the covertype dataset.
C++ API example
In this section, I assume that you have basic knowledge of C++ language so that you can follow the below example. First, create a cpp file named “rf-mlpack.cpp” with the following command:
touch rf-mlpack.cpp
As you might have guessed, the first step is to add mlpack headers files at the beginning of the C++ code as follows:
#include <iostream>
#include <mlpack/core.hpp>
#include <mlpack/core/util/cli.hpp>
#include <mlpack/core/data/split_data.hpp>
#include <mlpack/methods/random_forest/random_forest.hpp>

#define BINDING_TYPE BINDING_TYPE_CLI
#include <mlpack/core/util/mlpack_main.hpp>
Above header files are needed to spit the dataset and also train a Random Forest Model. Next, we define the main function, which is a little bit different from a typical C++ program. mlpack has its own main function which accepts command line arguments. However, you are not forced to use this.
using namespace std;
using namespace mlpack;
using namespace mlpack::util;
using namespace mlpack::tree;
void mlpackMain()
{
// Write following C++ code example here.
}
The first step is to load the dataset into an Armadillo matrix. Make sure that you use the correct path to the dataset.
arma::mat samples;
arma::Row<size_t> labels;

data::Load("./dataset/covertype-small.data.csv",
samples, true);
data::Load("./dataset/covertype-small.labels.csv",
labels);
Similar to CLI example, we split the dataset into train and test sets in C++:
arma::mat trainData;
arma::mat testData;
arma::Row<size_t> trainLabel;
arma::Row<size_t> testLabel;

data::Split(samples, labels, trainData, testData,
trainLabel, testLabel, 0.3);
Now, it’s time to create an instance of random forest classifier in mlpack API.
const size_t numClasses = arma::max(labels);
const size_t numTree = 10;
const size_t minLeafSize = 3;

RandomForest<>* rfModel = new RandomForest<>();
After initializing an instance of RF classifier, it can be trained with the dataset and specified hyper-parameters as follows:
rfModel->Train(trainData, trainLabel, numClasses,
numTree, minLeafSize);
Next, we predict the labels of the test samples with the following code:
arma::Row<size_t> pred;
rfModel->Classify(testData, pred);
The last step is to compute the accuracy of the trained RF classifier.
const size_t correct = arma::accu(pred == testLabel);
cout << "Accuracy on test samples: " <<
 double(correct) / double(pred.n_elem) * 100 << endl;
And also don’t forget to free up the memory when you’re done.
delete rfModel;
After you wrote the entire example in the “rf-mlpack.cpp” file, you can compile the file using the following command:
g++ ./rf-mlpack.cpp -o rf-mlpack -O2 -std=c++11 -fopenmp
-larmadillo -lmlpack -lopenblas -lboost_serialization
-lboost_program_options
Notes on compilation:
- -fopenmp flag is needed. Because mlpack uses OpenMP library to speed up algorithms on multi-core CPUs.
- C++11 flag “-std:c++11” as stated in documentation of mlpack.
- Moreover, you need to link the program with the libraries, Armadillo, mlpack, OpenBLAS and Boost. Note that I installed Armadillo with OpenBLAS library. You may remove “-lopenblas” if you haven’t installed this library.
Finally, run the generated executable to see the results:
./rf-mlpack -v
On my Ubuntu system, I achieved an accuracy of 82.24 percent on test samples. Also, the execution time was about 10 seconds.
As you’ve seen in this example, mlpack’s C++ interface is somewhat clean and simple. We trained and tested a classifier in several lines of code. In the next section, I compare the scikit-learn’s random forest with that of mlpack in terms of speed.
Benchmark
I used scikit-learn quite often for my projects as it is probably the most popular ML library out there. Thus I decided to compare scikit-learn’s random forest classifier with that of mlpack in terms of computational time. However, bear in mind that this is NOT an extensive comparison between the two libraries. Moreover, I do NOT say one library is better than the other. I just wanted to conduct an experiment for my curiosity.
Test Environment
Before presenting the results of the benchmark, I should briefly demonstrate my system spec, which is shown in the below table:
| CPU | AMD Ryzen 7 1800X @ 3.6 GHz |
| RAM | 16 GB @ 2.4 GHz |
| Storage | Samsung EVO 750 SSD 250 GB |
| OS | Ubuntu 18.04.1 LTS |
It should be noted that the above usage examples are run on this system.
Results
I ran the random forest classifier 5 times in both libraries. The mean of 5 trials are shown in the below figure:
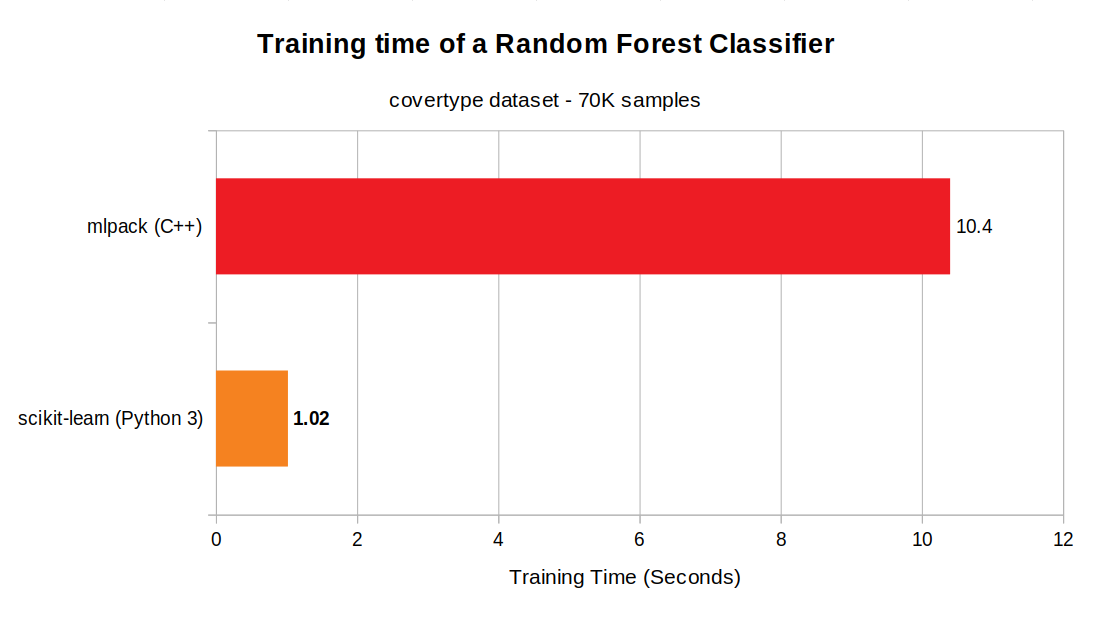
scikit-learns’s random forest classifier is 10 times faster than that of mlpack, which is quite odd! I had actually expected mlpack to be faster. Because it is implemented in C++ and uses Armadillo and OpenMP. As a result, mlpack uses several cores of a CPU when one trains an RF classifier. However, scikit-learn’s RF classifier runs on one core! Moreover, the hyper-parameters in this experiment were the same for both scikit-learn and mlpack. I should do a bit of research soon to find out why the benchmark results are drastically different. I guess that this is probably due to the difference in algorithm or implementation.
Wrapping up
So far we have looked at the mlpack library. Usage example for both CLI programs and C++ API were given. As you’ve seen, mlpack’s useful CLI programs help you run ML algorithms quickly without writing code. Moreover, mlpack provides somewhat easy-to-use C++ API that helps you train and test a classifier in several lines of C++ code. (If you are a C++ programmer, I suggest you explore mlpack more than I did in this post.) I also made a limited comparison between the scikit-learn and mlpack in terms of speed using random classifier. However, benchmark results need further investigation as it was unexpected and odd!
In the end, I should mention that both the usage examples including the benchmark code can be downloaded on GitHub here. If you have questions or problems, let me know by leaving a comment below. Moreover, I’d like to know your opinion on the benchmark I did above.